
Page 27 - Raspberry Pi as a Foundation for Boosting Computer and Technology Literacy
P. 27
Official Raspberry Pi operating system 2.1
a media player distribution for entertainment, click on “Media Player
OS” and select LibreELEC; if you need an operating system for stream-
ing and playing music, you can choose Volumio or do some research to
see if there are better distributions for playback and the streaming of
music files (say MoOde, Ropieee, Vitos, etc).
Next, you have to choose storage. Storage is the microSD you have
put in your reader for the OS to be installed on.
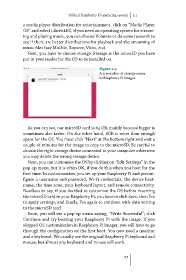
Figure 2.4
A screenshot of storage menu
in Raspberry Pi Imager.
As you can see, our microSD card is 64 GB, mainly because bigger is
sometimes also faster. On the other hand, 8GB is more than enough
space for the OS. You must click “Next” at the bottom right and wait a
couple of minutes for the image to copy to the microSD. Be careful to
choose the right storage device connected to your computer otherwise
you may delete the wrong storage device.
Next, you can customize the OS by clicking on “Edit Settings” in the
pop-up menu, but it is often OK, if you do this when you boot for the
first time. In customization, you set up your Raspberry Pi and precon-
figure a username and password, Wi-Fi credentials, the device host-
name, the time zone, your keyboard layout, and remote connectivity.
Needless to say, if you decided to customize the OS before inserting
the microSD card in your Raspberry Pi, you have to click Save, then Yes
to apply settings, and finally, Yes again to continue with data writing
to the microSD card.
Soon, you will see a pop-up menu saying, “Write Successful”; click
Continue and try booting your Raspberry Pi with the image. If you
skipped OS customization in Raspberry Pi Imager, you will have to go
through the configuration on the first boot. You now need a monitor
and a keyboard. We usually use the original Raspberry Pi keyboard and
mouse, but almost any keyboard and mouse will work.
27